Help
Contents
The confirmation email
The quiz report
How TAKE-A-QUIZ works
Why does the Members link turn yellow?
How BUILD-A-QUIZ works Back to Contents
Overview
To prepare a quiz with BUILD-A-QUIZ, start by signing in. Then traverse the various categories under Drills, Quizzes and jot down (on paper) the Build-a-quiz problem ID numbers that you want to include on your quiz. Up to 100 problems are allowed per quiz, in any order, and duplicates are allowed. Then click the green BUILD-A-QUIZ button, enter your problem IDs on the form, and press Done when finished. You will receive a test ID on the next screen, and you'll also make up a password. (Both are given to your students for use with TAKE-A-TEST.) Also on that screen you will select when you want the report emailed to you. That's it! You're quiz is ready to go. Now just give the test ID and password to your student(s) and wait for the email report. (Actually, you can get a quiz report at any time; you don't have to wait for the email. Just go through the yellow Members tab once you're signed-in and select 'Get Quiz Report.' The quiz report will appear on screen as a pdf, which you can download to your computer.)
Step-By-Step
1. First, become a member by registering. BUILD-A-QUIZ is unavailable (red) until then. Go to the Members link at the top of the page, then click Register.
2. After you have registered, log-in. Logging-in activates (turns green) the BUILD-A-QUIZ tab. It also allows you to see the answers when you open the links.
Otherwise, all you can see are the questions in the links. (After logging-in you can actually take a test, too.)
3. Once the BUILD-A-QUIZ tab turns green, you are ready to build your quiz. Start by perusing the quiz links under Algebra I.
4. As you peruse the links, jot down the "Build-a-quiz problem ID"s you'd like to include in your quiz. Those IDs appear at the bottom of each question.
(They will appear on your quiz report, too.) You can select up to 100 questions from anywhere on the site, and up to 500 students can take a quiz.
5. Once you have all your problem IDs, click the green BUILD-A-QUIZ tab to bring up Screen #1. Then enter (type) your problem ID numbers into the box.
Any order is allowed. Duplicate questions are also allowed. You can separate the numbers with a comma, a blank space, or both.
(Use your mouse to 'copy' the numbers before clicking Done just in case you want to 'paste' them back later.)

6. After entering your numbers, click Done. (An empty box will quit and return you HOME.) You will then be shown a preview of your quiz (Screen #2).
If you'd like to rearrange your questions, click Cancel, go back to BUILD-A-QUIZ, paste your numbers back, then make your changes.

7. When you're happy with your quiz, click Get a test ID. Your test ID will appear at the top of the next page (Screen #3).
On Screen #3 you will answer a few setup questions that determine how your students will login, and when (time and date) you want the quiz results emailed.
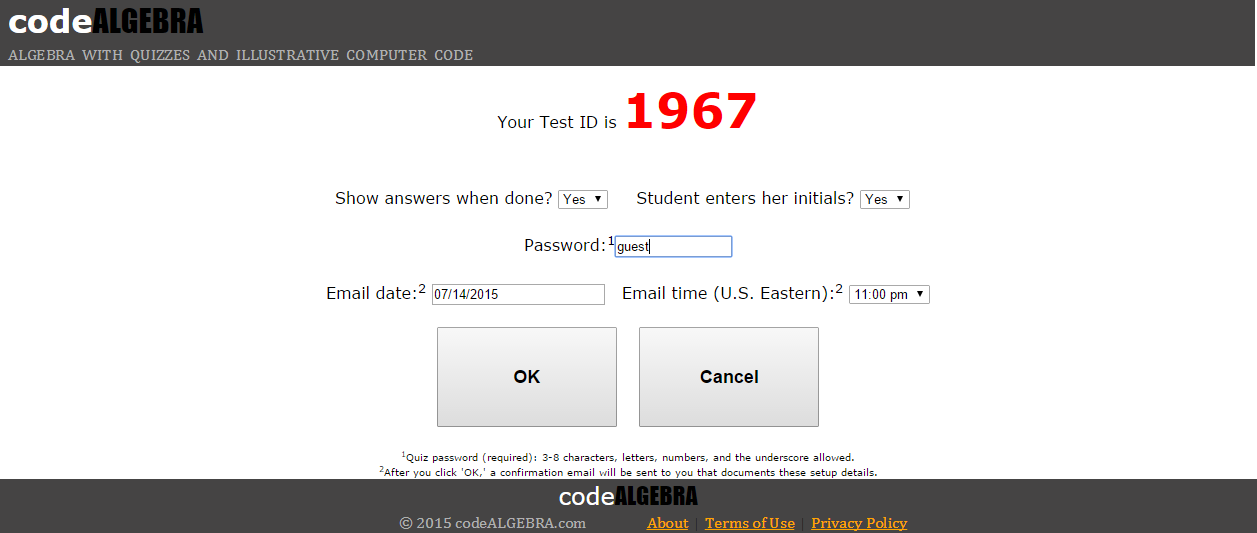
These are the setup questions:
- Show answers when done? 'Yes' if you want the correct answer to be given after the Submit button is pressed.
'No' will only state whether their answer was correct or incorrect.
- Student enters her initials? Use of initials can be an identity sanity check for the teacher while still maintaining the student's privacy.
- Password: Passwords can contain 3-8 alphanumeric characters, including the underscore. Case insensitive. You can change the quiz password at any time.
- Email date: Pick the date you want your results emailed to you. It should be after the quiz completion deadline you assign to your students.
(Aside from the emailed results, you can get a quiz report at any time by logging-in and clicking the 'Get Quiz Report' link.
The report you'll get is identical to the emailed version, only updated. It will contain all the pre-email and post-email results in a single report.)
- Email time: Pick the time of day you want the report emailed.
8. After answering the setup questions, click OK. A confirmation email will automatically be sent documenting your choices. (See The Confirmation Email.)
9. Finally, give your students their individual Student ID numbers, the Test ID number, and the quiz Password.
Note that you must assign the student ID numbers. Use the same ID for each student all year.
Valid ID numbers range from 100-999 because that is the range available in the "Select your Student ID" menu when logging-in to a quiz. (See Screen #2--Login.).)
10. Students complete the quiz.
11. Once the quiz is over (the email time has passed), you will automatically receive your quiz results by email. There is only one emailed report per quiz.
12. But don't worry. If any students missed the quiz, they can take it later and you can still get an updated report that includes their scores.
Just use the Get Quiz Report link in Members to create a new report. And with Get Quiz Report you can get a quiz report at ANY time--before or after the email.
You don't have to wait for the email to see the quiz results so far. But please note: if nobody took the quiz by email time, then no email will be sent.
Your Confirmation Email Back to Contents
A confirmation email will arrive minutes after you exit the BUILD-A-QUIZ setup screen above (Screen #3--Answer Setup Questions).
Note that it might end up in your email spam folder as junk, so be sure to check there too.

Your Quiz Report Back to Contents
A sample quiz report is here. After viewing the sample report, you can use your browser's back arrow to return to this page.
There are two ways to get reports: by email (only one email is ever sent), and by selecting Get Quiz Report in the Members area. Both are pdf documents.
(If any students happen to take the quiz after the email was sent, you can obtain an updated quiz report via the Get Quiz Report link as described above.
All pre-email and post-email students will be included in that updated report. It will be a comprehensive report listing all students who ever took the quiz.)
The first page of the report lists the test ID and teacher's (Member's) name on the top line.
A symbols key appears on the next line. These are symbols that can appear under the problem numbers.
The answer key appears on the next line. These are the correct answers and they are given in capital letters.
In the left column are the student ID numbers, followed by initials, quiz score, and start and elapsed times.
In the problem area on the right, a dash (-) means that number was answered correctly.
A lower-case letter (red) means that the problem was answered wrong, and that particular lower-case letter was the answer that was given by the student.
Aong the bottom is the total number of students, the class average and standard deviation. A tally of wrongly answered questions is also there.
The graph on the next page shows the percent of students answering WRONG. In the sample report, not that 70% of students answered question #7 wrong.
Subsequent pages list every question in the quiz. An 'X' indicates the correct answer. The original BUILD-A-QUIZ number appears at the bottom.
Remember that you can get a report at any time by going to the Members tab and selecting the Get Quiz Report link. You don't have to wait for the email.
How TAKE-A-QUIZ works Back to Contents
1. Start by clicking the green TAKE-A-QUIZ button. (You must first have a valid test ID number, student ID number, and password.)
2. Next, enter your Test ID in the box (Screen #1). Start by locating your cursor in the box and clicking, then type-in your ID. Press Next.

3. On the login screen (Screen #2), enter your student ID, your initials (if asked), and your password (if asked). Then click Start Test.

4. You will be taken to the actual quiz (Screen #3). Answer all the questions and click Submit when finished. The bottom of the quiz screen is shown below.

5. Screen #4 shows the bottom of the answer page. When done reviewing the answers, click Return to codeALGEBRA. You will be returned Home.

Why does the Members link turn yellow? Back to Contents
Yellow indicates that you are logged-in. It is a reminder to log-out when you're done.